Tuesday, 13 December 2011
Nina Kina
Sunday, 11 December 2011
Pimp my Baby Jogger
Sunday, 13 November 2011
Christmas Craft Part 1: Potato Printed Wrapping Paper
Every year at Christmas time I feel the urge to get crafty and I dream up a long and unachievable list of handmade and DIY projects. Having kids makes the urge even greater as I attempt to relive happy kids craft memories with my daughter, who is not always as cooperative as I might like.
Last Christmas was memorable for its handmade failures. There was the gingerbread house that collapsed within 12 hours due to the humidity, the gingerbread men that suffered a similar fate and started shedding limbs, and salt dough decorations that took forever to dry out and then went soggy and fell from the tree (leaving their ribbons behind). The most memorable disaster occurred when we were gathered at the dinner table and started pulling the handmade crackers. We were expecting to find a candy cane and hand written joke in each so it was quite a surprise when a small army of sugar ants came flying out!
This year I had grand delusions of making all gifts handmade, but luckily remembered just in time that a mother of three kids under four might not have a load of time on her hands. So instead I'm going to try and keep it simple, tasteful, and ant-free!
Potato Printed Wrapping Paper
Equipment: potatoes, cookie cutters, sharp knife, roll of craft paper or brown paper (we used a roll of craft paper from Ikea), kid's acrylic paints, plastic lids.
Press potato haves down onto cookie cutter until the cutter is about 1cm deep, or as far as you can go before it cuts through the other side of the potato. With the cookie cutter still in the potato, use a sharp knife to cut away the centimentre outside the cutter.
We chose just two colors, warm yellow and red, and used plastic lids from baby formula tins (of which we have hundreds) as paint dishes.
Red stars. I was happy with how these turned out, and with the streaky effect I got as a result of doing it on the timber outdoor table.
I think the squirrels are my favourite even though it is not very Christmassy, especially here in the southern hemisphere.
The last time I tried potato printing was 2 years ago...Nina was 20 months old and more interested in covering her body with paint. I thought she would be better suited for the task this time around, but she preferred mixing all the paints together and using a paint brush to create a giant splodge on the paper. She lost interest in about 5 minutes, and I was left wondering why I bother. She is so creative and loves craft but I just can't get her to follow my instructions on tasks like this. Maybe I am expecting too much from a 3 year old, or maybe the designer in me is containing the artist in her? Anyone have any good tips for engaging toddlers in these kind of activities?
Stay tuned for Christmas Craft Part 2: Cotton Braid for Wrapping Gifts.
Wednesday, 5 October 2011
Buttons for Baby Kina
As a mother of twins it is now impossible for me to go anywhere without encountering total strangers who feel compelled to offer advice. One thing people often say is "you mustn't dress them the same!". I'm a pretty easy going type of girl and don't really go in for must dos and don'ts. I also know that the twins have very different personalities and get treated as individuals regardless of what they are wearing. I often dress them in matching or coordinating clothes because (a) it requires less thought and makes my life easier, (b) if they are wearing the same I know that one won't be any hotter/cooler than the other, and (c) my mother-in-law always sends 2 of every outfit.
So at the moment I am knitting not one, not two, but three Baby Kina cardigans. I had always planned to knit one each for the twins using the Debbie Bliss Eco Baby cotton, but originally I thought I would knit Georgie Hallam's Acacia for Nina using the Cascade Ultra Pima. Once I started knitting the first Baby Kina Nina saw the pattern and told me that she wanted one too. I decided she would get more wear out of a light cardigan than a knitted singlet, so I am going to fudge the pattern using thicker yarn and bigger needles , and maybe a few extra stitches, and hopefully end up with something that will fit a 3.5 year old.
On Monday we went on a little expedition to the local haberdashery shop to buy buttons for all three. I took a skein of each yarn and came back with two options for each. Now I just need to decide which ones to use.
Here's what I'm thinking...
- Small shell buttons on the mauve
- Square peach buttons on the peach
- Large round pink shell buttons on the pink (these were actually Nina's choice and I think it was a stroke of genius. On it's own I thought the pink was too dark for the yarn, but held against it the sheen of the shell and the cotton complement each other perfectly!)
Or should I use the shell buttons on the peach to match the mauve cardigan?
Saturday, 10 September 2011
Saturday Morning
With the twins a little under the weather and the weather a little windy, we decided it might be best to spend the day at home. Junior Chef and I whipped up a batch of raspberry muffins for morning tea and I got a chance to play around with my new camera.
We used this basic recipe, replacing the blueberries for frozen raspberries and adding some lemon zest. It's a good recipe to make with a toddler as it gets you to rub the butter and flour together, and what 3 yr old doesn't love getting their hands in the bowl. They might not have been the moistest of muffins but they were quite tasty and went down well with a coffee.
Sunday, 14 August 2011
How do they make green wool?
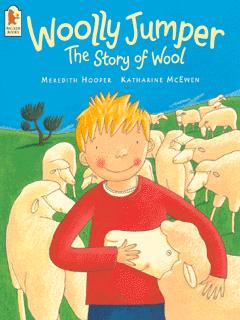
The other day my three year old daughter asked me how they make green wool. I tried to explain that they dye it - "you know, like when we dyed the eggs at Easter time". As often is the case, she wasn't 100% satisfied with my brief explanation. So I was thrilled when I discovered this picture book at the library a few days later.
Woolly Jumper: The Story of Wool by Meredith Hooper is a great book that describes the process of how wool is made, starting with the sheep in the field and finishing with the knitted jumper.
The main part of the book illustrates each step of the process and gives a simple description, but there is a more detailed explanation of certain areas and terms - like how the wool is "scoured" and "carded" on the inside back cover. This is written in very clear, kid-friendly language and answered most of the questions my daughter had asked me whilst I was attempting to read her the book for the first time.
I think it's a great book for both children and their parents. I learnt a few things myself and Nina is now keen to visit a sheep farm.