Showing posts with label projects. Show all posts

Thursday, 18 March 2010

Koolhaas Progress

Progress is slow but satisfying. Any accomplished cable knitter would groan at the sight of me painstakingly knitting the 1st and 5th rows of the cable repeat, where every second stitch is crossed. Having only ever knitted one cable before I think it was pretty ambitious of me to even try. Next time I might try to master cabling without a cable needle.


- Posted using BlogPress from my iPhone

Monday, 15 March 2010

The Easter Bunny's Coming

My almost 2 year old daughter is at that age of discovery where every second she asks (or demands) "what's that?". She was particularly curious about the brightly coloured shiny eggs and bunnies that started appearing in the supermarket a month or so ago. I explained to her that "the Easter Bunny is coming" and to my surprise she has been happy enough with this explanation so far. This year Easter will be a lot of fun. I'm planing an Easter egg hunt I'm the garden for her, at the end of which she will find a gorgeous knitted bunny!

I purchased the pattern for Ysolda's knitted rabbit Sophie last July but after one too many failed attempts at the fiddly disappearing loop cast on I gave it up. Easter gave me the perfect excuse to pick it up again but this time I did things a little differently. Firstly I did not try to knit it with acrylic yarn (I feel nauseous just thinking about the stuff I started to use last time), I bought myself a set of 3mm Knitpro Symfonie Wood DPNs, and most importantly I convinced my mum to do a Sophie knitalong with me.

We spent about half an hour huddled in front of the computer with out knitting needles trying to make sense of the instructions for creating the disappearing loop cast on. There was a lot of swearing, and dropped needles, and more swearing! But we both got there in the end. The head and body knitted up beautifully and quickly. I love Ysolda's ability to incorporate the increases and decreases into the character of the toy, and stuffing as you go and attaching appendages by picking up stitches means that there is now seaming or sewing in ends.

I've knitted the legs now and am half way through the first arm. The legs were straight forward enough but the arm was a bit tricking to begin with due to the head getting in the way and maneuvering 5 needles in such a tight space.

Sunday, 14 March 2010

Nina's Milo Vest and Poor Boy Cap

Today the weather was finally crisp enough to dress Nina in her new Milo vest and Poor Boy cap, both of which were finished a couple of weeks ago. I am very happy with the vest and she looks super cute in the cap even though it is way too big and I had to pin the peak back with a brooch so that she could actually see.

Friday, 12 March 2010

Progress Report - Romantic Vest

Although it is a painfully tedious process, I have been forcing myself to knit a row here and there when I'm on the train or in the car. And slowly but surely I am beginning to see a faint light at the end of the very long tunnel... I am almost finished knitting the back! How I will ever find the motivation to even cast on the front I don't know but for now I am focusing on the positive aspects.
Listening to the Never Not Knitting podcast helps to keep my mind entertained even if my hands seem to be working in slow motion.

I also took courage today when my sister sent me 21 gorgeous photos of my nephew Xavier wearing the seed stitch hoodie that I knitted for him last year. The fresh autumnal weather this morning gave her the opportunity to put it on him, for what could be the last time as he is almost too big for it now. At the time I found knitting the seed stitch very tedious but seeing it again now after 6 months I am very impressed with how it looks and am proud to have knitted it.

So onwards and upwards...

Monday, 1 March 2010

Stash Guilt

I'm feeling a little guilty this afternoon; because of a couple of recent yarn purchases. Retail guilt is something I experience on a regular basis; not because I shop a lot, but because I tend to agonize over any purchase that is not essential. This really takes the fun out of shopping. It usually doesn't extend to the buying of books and toys for my daughter or the occassional purchase from an online yarn store. But this time is different...

Today I received a package in the mail from Tangled Yarns, an online and retail store based in Brisbane. I came across this store when I was searching for Australian stockist of Malabrigo yarn. There is such a cult following of this yarn on Ravelry that I really want to see what all the fuss is about. I have a pattern queued: Koolhaas by Jared Flood for Jamie (which 763 out of 4474 Ravelry users have used Malabrigo to knit) and now just need to get my hands on the yarn.

When I went to place my order a week and a half ago Tangled Yarns were out of stock of most colours of the Worsted Merino (10ply). By this stage I was in a bit of a frenzy, I wasn't prepared to leave the online store without some Malabrigo in my cart! So I ordered a skein of the Silky Merino (8ply) in teal feather and a skein of Cascade 220 (10ply) - also hard to come by in Aussie yarn stores - in teal also. I don't remember what the logic was at the time. I think I'd figure it out when they arrived. And today they did and I'm not happy with myself.

I don't love the teal colour of the Cascade 220, and it's not the most masculine of colours either. It is definitely not the yarn for Jamie's Koolhaas. The malabrigo silky merino is divine to touch and a lovely muted teal colour, but it is only a 150 yard skein so not enough for the Koolhaas even if I wanted to try and make it in this.
Solution:
1) I've ordered the Malabrigo Worsted Merino in 3 different colours (since my last order Tangled Yarns just so happened to receive a new shipment!). Hence the stash guilt.
2) I have queued a different hat for Jamie to make use of the Cascade 220 and I've queued a hat for myself to make use of the malabrigo silky merino. And so my queue of projects grows...

Sunday, 28 February 2010

Milo Vest

I am very happy with the results of the Milo vest that I knitted for Nina. It's a great, simple top-down pattern knitted in the round. I chose to knit this for 2 reasons: 1) I wanted to road test the Utiku Perendale 8ply yarn that I bought in NZ last year (it is so reasonably priced and the colours are great so it could be a staple), and 2) I wanted to knit something with one skein and that included a cable. My first cable!

The yarn is not the softest and is a little fuzzy but it knits up nicely. Hopefully it won't be too scratchy, but it shouldn't matter with this garment because she will always wear something under it. This is going to be a nice warm vest for Autumn/Winter.

So this was my first attempt at knitting a cable and I am very happy with the result although I actually missed one row out of the giant cable repeat. Because of this and the fact that I knit tightly anyway (and especially when crossing the stitches) I think that the cable is a little tighter than it should be. I stretched it out when wet blocking it and I think that has made a big difference as you can see in the before and after shot below.
Left: Before blocking. Right: After blocking

Above: Close up of my cable

Above: A very lovely cast off edge. I used the decrease cast off method for the first time and loved it. I tend to cast off too tightly and usually find it slow going so this kills two bird with one stone. I used this Knitty article for instruction as recommended in the pattern.

I ended up with half a skein left and have decided to whip up a cute hat to match.

Thursday, 18 February 2010

Knitting on public transport

I was surprised the other day when a friend of a friend told me that she read my blog. It was a bit of a confidence boost, but at the same time it made me feel like I should be offering more. I thought I could start by telling you a bit of more about me...
I love to knit on public transport. Two days a week a commute via train from the Blue Mountains - an hour and a half west of Sydney - to Stanmore in the city's inner west, where I work as a graphic designer for Polli. The trips to and from work are my time to indulge in uninterupted knitting pleasure - no toddler or husband fighting for my attention.
Last week I did something I didn't think I should do, but couldn't resist...I cast on a new project before finishing my current one! At first it looked like my Bluebell Romantic Vest might be forced into early retirement by Nina's Milo vest, but this week I made a pact with myself; Milo on the way to work, Bluebell on the way home. Mixing it up like this suits me to a tee; it breaks up
Milo's stocking stitch in the round and my vest's fairly tedious ribbed lace pattern. I think I will make a habit of having a couple of projects on the needles at the same time, as long as I make sure to share the love.
Perfect for early morning knitting, Milo vest in 8ply
On the way home, my Bluebell vest progresses slowly but surely.

Tuesday, 2 February 2010

Slow Progress

So this is where I am at with Bluebell Romance Vest... I plan to get back into it any day now.


Saturday, 26 December 2009

Haltermelon

Just as planned I finished Nina's Haltermelon top just in time for a hot and humid Christmas Eve day lunch.

This is such a cute pattern. I made size 2 for my 18 month old daughter. She is petite around the chest so it is a bit big on her at the moment but she will grow into it in no time. In the meantime I have knitted an i-cord to go through the eyelets so that I can gather it with a bow.

I also picked up the stitches along the neckline and knitted a trim to match the one on the bottom edge. I wasn’t happy with the watermelon seeds that I embroidered (I didn’t like that i couldn’t get them to be a uniform size unless they were going in the same direction - though mind you, I am not an accomplished embroiderer), or the ones that I knitted and sewed on, so I found some small matte black buttons instead.

I found this video on YouTube to help me with the cast on:
Purling in a Long-tail Cast-On

Monday, 19 October 2009

A Bout of Booties


Blue Booties for Felix
 
Peach Booties for India

 
Yellow Booties for Alice

I have been wanting to knit Saartje's Bootees (ravelry link) ever since I started knitting again at the beginning of the year and have finally had an occasion to - 4 friends had babies in the past month - so I knitted 3 pairs in one weekend to have a break from my Buttercup woes.I used whatever yarn I could find in my mum’s stash. The last pair (the blue ones) were the best and were knitted in Patons Bluebell which is a lovely 5ply and what I used for Nina’s beret and mittens.

I couldn’t figure out how to do the long tail cast on using 2 strands of yarn so I turned the work and did a cable cast on. This worked fine and would recommend it to others who are new to LTCO like me, you just need to remember that when you are on the second strap you need to purl all stitches instead of knitting.
I also skipped the button loops and sewed the straps down and the buttons on top. Most newborns hate getting dressed and I think it would be easier for the (sometimes) stressed out mum.
 

*Just did a search through the comments and forum postings on this pattern and found this youtube link (thanks to Ravelry user Zippy69!) which shows it perfectly. There is something so very Zen about the LTCO!

Buttercup Progesses Slowly

My hopes of finishing Buttercup before this month's Knitters Guild meeting were sadly not realised. I am in the midst of stocking stitch in the round drudgery! And taking a weekend out to knit 3 pairs of Saartje's Booties did not help matters (but more on that later). I am fairly happy with progress despite this and the fact that my knitting to this point is not flawless. I am a little concerned that Medium size is going to be a bit bigger than I'd hoped, and am also worried that I will be a ball and a half short of the cotton yarn. I enjoyed learning how to do long tail cast on ( I used this tutorial) and think I will use it on a regular basis, as it seems to get around the fact that I normally cast on (with cable cast on) quite tightly and slowly.

Friday, 25 September 2009

Build me up Buttercup!

I wanted to knit myself something for summer, in order to keep the spirit of knitting alive through the warmer months. I've chosen the very popular free Ravelry pattern Buttercup by Heidi Kirrmaier; a top-down raglan tunic with a lace detail across the decolletage. I am knitting it in the lovely Jo Sharp Soho Summer DK Cotton in Blush (which is a bit softer than it appears in the photos below).


I cast on last Friday night in time to take it along with me to the Knitter's Guild meeting on Saturday and have set myself to finish it before next month's Guild meeting. So far I have been doing well and am currently into the lace part, soon to separate the sleeves and continue knitting the body - tedious stocking stitch in the round.

Sunday, 2 August 2009

Ravelry Saves the Day


One of my latest projects has been a double-breasted hoodie in moss stitch that I was hoping to complete in time for the birth of my new baby nephew Xavier. Not only did I not finish in time to make this a gift at the time of his birth but I also had my own Knitter's Nightmare and ran out of yarn when I was 90% through. When I had purchased the Naturally Merino 10 ply the lady in the shop told me that it was the last 4 balls they had, but I didn't realise that it was a yarn from 2002 that I couldn't find any where.
After searching every online yarn store that I could find without success, I finally searched on Ravelry and found it in someone's stash. It was the same colour but a different dye lot, but it was my only chance. So I emailed the owner and asked if she could spare a ball. My new firend Joyce from Odessa, Missouri sent me 2 balls and saved the day. Today i sent her two skeins of yarn
(below) hand spun by my mum. Now I just need to finish the jacket before it is too hot or Xavier is too bog for it.

Thursday, 16 July 2009

Diamond Fern Stich Mittens

After finishing Nina's mittens I decided to make something for myself; a pair of fingerless mittens to keep my hands warm whilst working at Wentworth Falls. It should have been a pretty straight forward project. I found a pattern on Ravelry for fingerless mittens in a feather and fans lace stitch, knitted flat and then stitched up the side leaving a hole for the thumb. Having already knitted the fan stitch sample square back in May I didn't think I would have any problems.

I first came unstuck with the pattern when it called for me m1 (make one). I am by no means an expert but as far as I can gather there are many different ways to m1. My bible on these matters, the 'Readers Digest Complete Guide to Needlecraft', describes 8 ways to increase by changing yarn position. The pattern also asks me to do yo
(yarn over) increase, after a knit stitch and before a knit stitch, which again is omitted from the Guide.

In a fit of frustration I decided to scrap the project. I was not that passionate about the pattern and thought that I could improvise a similar pattern with a stitch I hadn't tried before; the Diamond Fern Stitch. Referring once again to my trusty Needlecraft book, I cast on for the third time (there was also a case of rib gone wrong) and knit the 8 rows of 1:1 rib and the first 20 rows of the lace stitch pattern. It was at this point that Jamie said to me "but the diamonds aren't going to match up!". And he was right. The stitch pattern in my trusty book started with the solid part of the pattern and finished with the open lace part.

CO #4 - I try to wing it, adding an extra 6 stitches to the CO and hoping this will complete the half diamond at the end. Something goes very wrong (I actually think I dropped a stitch to tell you the truth) and my lace starts going haywire.

Finally, I decide to get myself a pad of graph paper and draw up a stitch chart (below). And what a revelation! I am a very visual person and with the help of the stitch chart I could finally make sense of the relationship between the stitches and the pattern, and was able to complete the missing half diamond correctly.

Unfortunately the first prototype turned out too big, even for my wrists. They even fit on Jamie's calves. I didn't even bother sewing up the second one or photographing the finished one. But I am determined not to get despondent, and will revisit the project soon (after a few baby presents are knitted). Not too bad for my first attempt at an improvised pattern.

Sunday, 21 June 2009

A Tale of Two Pom Poms

...or Thin and Sad Vs Fat and Happy. It had been some time since I had made a pom pom, very possibly decades. I remember making them in primary school, so approached my first pom pom making project this century with a high level of confidence. how hard could it be? On top of the years of life experience I had gained since primary school, I had also purchased myself a dedicated "Pom Pom Maker" - so self explanatory is the task that the packaging does not bother to include instructions!
My first attempt took at least a couple of hours. I used my pom pom maker (below) and thinking I wanted quite a large pom I left the 3 coloured rings joined together and proceeded to wind my yarn in a radial fashion using a tapestry needle. I wanted to use a solid pink yarn to compliment the flecked hot pink yarn, so I painstakingly alternated the colours, winding only a single thread at a time. Increasingly I found it harder and harder to fit the needle through the centre of the pom pom maker. I had a bad feeling about this pom...


...The result is the emaciated, scruffy-dog excuse for a pom pom you see on the left of the top picture. What a blow! But I was not to be defeated, failure is after all the best way to learn. On attempt #2 i really smartened up my game. Using only the yellow rings of the pom pom maker, I thread both colour yarns through the needle at once and used them doubled over. What a brain wave! I'd quadrupled my productivity before I even started!!
The result is a fat and bouncy, heavy-weight pom. Almost a little too heavy to be attached to the beret, but it will go there anyway. He could still do with a hair cut, but I'm afraid that I will get carried away, so I have put the scissors away.

Raspberry Beret

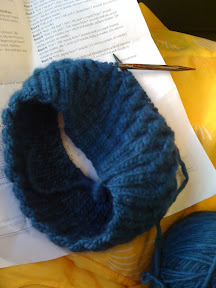
For my second project I wanted to tackle knitting something on four needles (having tried and failed in the past) and decided to knit a baby beret. I used a pattern that Mum had used to knit a couple of berets for Nina last winter, although Mum knitted hers in stockinette rather than garter stitch.
I definitely got the hang of the four needles by the end, and am happy enough with the result even though I had a few issues with the increasing and it looks a bit dodgy if you look close enough. It also sits a bit differently to the ones Mum made, in that it is quite wavy, but this is how it looks in the picture on the pattern so i assume it is right. Perphaps it doesn't have the same stiffness when knitted in stockinette?
Originally I planed to make it for my niece Charlotte's 2nd birthday. Nina's berets are quite big so I thought I could get away with using the 6-12 month sizing. I didn't finish in time for Charlotte's birthday and it is too small, so it will go to my muse Nina (though it won't fit her for long either).

Thursday, 11 June 2009

The Doodle Pants Done

I am very proud to have finished my first project within a week. I actually finished knitting them last Thursday but only finished sewing in the threads yesterday. Being the novice that I am I wasn't sure how to actually do this and was waiting for mum to get back from a road trip to Brisbane. Yesterday was so cold that I couldn't wait any longer and so with the help of a video tutorial on expert village I finished it off.

When I put them on Nina this morning I discovered that they are more "doodle tights" than "pants". Not the most flattering but comfy and warm none the less.

I definitely made some errors along the way (namely the ribbed waistband knitted with the wrong gauge needles!) but I have already learnt many new things: Kitchener stitch, how to knit and I-cord, how to knit a short row and how to weave in loose threads. I think the best way to get over the disappointment of one project is to move quickly on to the next, so I have started project two, a baby beret knitted on four needles
.

Tuesday, 2 June 2009

Doodle Pants

...so on Friday I bravely started my first project, Aubrey Doodle Pants for my muse Nina. I found the pattern through the Ravelry website, which ROCKS! I've had a few issues to tackle. Firstly, failing to get my head around the difference between metric, imperial, and US needle sizes resulted in my ribbed waist band being knitted with larger rather than smaller needles. I had to learn how to knit a short row and do kitchener stitch with the help of videos on youtube. Now that I am almost finished the first leg, I can't wait to start another project.

Related Posts with Thumbnails