A friend of mine was recently given one of these gorgeous knitted cacti as a house warming gift and I want one. The Arizona Knitted Cactus (above) and a gorgeous range of other succulents are hand made in Melbourne by Odds&Ends and available to purchase on Etsy. I'm also loving Odds&Ends creator Andrea Daniel's blog.
Monday, 30 January 2012
Friday, 27 January 2012
Little Knits
Things have been a little hectic on the home front since the beginning of December so it's been quiet here on the blog. I tend to get a little burnt out over the Christmas period, and unfortunately my crafting (and blogging) can shift from an activity of relaxation and escapism to one of self imposed deadlines and stress.
But don't worry, I have been knitting. Here are a couple of little knits I made before Christmas...
A gold star decoration for my Christmas tree. I think it turned out well, although I didn't enjoy knitting with the synthetic and stretching metallic yarn at all. I really like the pattern - I'm a sucker for a centered double decrease - but I don't really understand the use of a provisional cast on that then asks you to pick up (a heap) of stitches to knit the back. I hope to make more for the tree before next Christmas but will have to look into a way to work around this issue.
A big heart for Nina. I used this pattern but found the original size too small and fiddly, so I fudged a supersized version. I'm not 100% happy with the shape and am not a fan of seaming small things like this (or seaming anything for that matter). If I want to knit a heart again I will try this pattern from Gifted: Lovely Things to Knit and Crochet (which I happened to discover at my local library this week - yay!) which is knit in one piece and uses short row shaping.
Post-Christmas in the spirit of using up left-overs, I started a bit of stash busting and cast on 3 new projects. I'll keep you posted on the progress...
Tuesday, 13 December 2011
Nina Kina
Sunday, 11 December 2011
Pimp my Baby Jogger
Tuesday, 15 November 2011
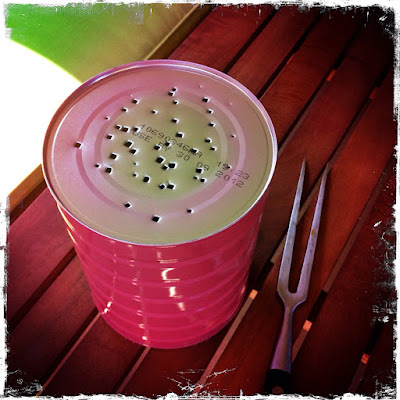
Formula Tin Succulent Pots
We go through a lot of baby formula feeding the twins so I am always trying to think good ways to reuse the mountain of empty cans that accumulate. Then, recently my mum brought up a bunch of succulent cuttings from her garden and so began my first project, formula tin succulent pots.
Quick dry enamel spray paint in pink and "mandarin". 3 coats of the pink and 4 coats of yellow.
Drainage holes punched into the bottom with a carving fork. This was my husband's idea, I was going to use a drill. But I have to admit this was a quick and easy solution.
Add succulent potting mix, succulents and pebbles, and voila! I think they look pretty cute.
Sunday, 13 November 2011
Christmas Craft Part 1: Potato Printed Wrapping Paper
Every year at Christmas time I feel the urge to get crafty and I dream up a long and unachievable list of handmade and DIY projects. Having kids makes the urge even greater as I attempt to relive happy kids craft memories with my daughter, who is not always as cooperative as I might like.
Last Christmas was memorable for its handmade failures. There was the gingerbread house that collapsed within 12 hours due to the humidity, the gingerbread men that suffered a similar fate and started shedding limbs, and salt dough decorations that took forever to dry out and then went soggy and fell from the tree (leaving their ribbons behind). The most memorable disaster occurred when we were gathered at the dinner table and started pulling the handmade crackers. We were expecting to find a candy cane and hand written joke in each so it was quite a surprise when a small army of sugar ants came flying out!
This year I had grand delusions of making all gifts handmade, but luckily remembered just in time that a mother of three kids under four might not have a load of time on her hands. So instead I'm going to try and keep it simple, tasteful, and ant-free!
Potato Printed Wrapping Paper
Equipment: potatoes, cookie cutters, sharp knife, roll of craft paper or brown paper (we used a roll of craft paper from Ikea), kid's acrylic paints, plastic lids.
Press potato haves down onto cookie cutter until the cutter is about 1cm deep, or as far as you can go before it cuts through the other side of the potato. With the cookie cutter still in the potato, use a sharp knife to cut away the centimentre outside the cutter.
We chose just two colors, warm yellow and red, and used plastic lids from baby formula tins (of which we have hundreds) as paint dishes.
Red stars. I was happy with how these turned out, and with the streaky effect I got as a result of doing it on the timber outdoor table.
I think the squirrels are my favourite even though it is not very Christmassy, especially here in the southern hemisphere.
The last time I tried potato printing was 2 years ago...Nina was 20 months old and more interested in covering her body with paint. I thought she would be better suited for the task this time around, but she preferred mixing all the paints together and using a paint brush to create a giant splodge on the paper. She lost interest in about 5 minutes, and I was left wondering why I bother. She is so creative and loves craft but I just can't get her to follow my instructions on tasks like this. Maybe I am expecting too much from a 3 year old, or maybe the designer in me is containing the artist in her? Anyone have any good tips for engaging toddlers in these kind of activities?
Stay tuned for Christmas Craft Part 2: Cotton Braid for Wrapping Gifts.
Friday, 11 November 2011
Twin Baby Kinas
I finally got a chance to download some photos from the camera so now is my chance to show off my first two Baby Kina cardigans (and my growing bubs). Olive and Eliza are now 7months old and were more interested in putting the cardigans in their mouths than cooperating for a photo shoot. I might try to photograph them again once they can sit up unassisted.
This pattern is a simple knit but my knitting of it was hampered by lack of sleep, teething twins and carpal tunnel (I had carpal tunnel after Nina was born and have it again now). I'm very happy with the outcome and absolutely love the yarn. I'm now a quarter of the way through a third Baby Kina for Nina but only seem to be able to manage 3 or 4 rows a night. Slow and steady...


